How to Fix the WordPress White Screen of Death 2023

The WordPress white screen error is one of the most common errors that occur in Content Management Systems (CMS). This error renders your website inaccessible to both administrators and visitors. Fortunately, there are some easy ways you can follow to solve this problem… In this article, we will discuss the cause of the WordPress White Screen Error and how to fix it.
As the name suggests, the WordPress White Screen Error occurs when you encounter a blank white screen instead of the page you are trying to access.
You may encounter the white screen when trying to access the WordPress admin panel; you may only see the error on a specific post, or you may witness that the entire site is affected by the white page problem.
When the entire site is affected, it is difficult to determine if it is a WordPress issue, an internet issue, or a hosting issue.
Below, we have listed what can be done to solve the WordPress white screen error. Based on our experience so far, any of these solutions will definitely help you fix the white page problem.
1. Disable All Your Plugins
WordPress plugins allow you to enhance the functionality of the platform by adding specific features. It is one of the most popular features of WordPress, and many sites use multiple plugins at the same time.
If we assume that plugins are the cause of the white screen error, the easiest way to prove this is to simultaneously disable all plugins. Since you don’t have access to your website, you will need to use File Transfer Protocol (FTP), which allows you to access your site through a program and transfer files.
To access your website through an FTP program, you will need the Server name, Username, and Password information. If you don’t have a program, we recommend using the open-source FileZilla. After downloading and installing the program, find the Server, Username, and Password sections under the toolbar.
You can learn your FTP information by logging in to your hosting account and finding it in the FTP section.

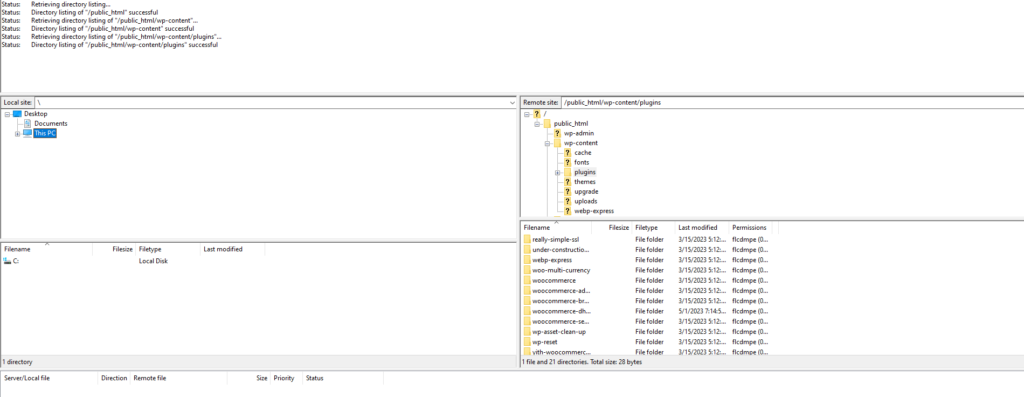
Enter the required login information into the respective boxes, and then click the Quick Connect button. The program will connect to your server, and once it is successful, you will see folders in the panel on the right-hand side.

If you’re confused, the files on the left represent the ones on your computer, while the ones on the right represent the ones on your server. You can transfer files by dragging and dropping between the two. For now, locate the public_html folder on your server. This directory is also known as the WordPress root folder and contains all the files and folders that enable the platform to function.
Once you enter the folder, follow the instructions below to disable all plugins:
- Find the “wp-content” folder within the public_html folder.
- Inside the “wp-content” folder, locate the “plugins” folder.
- Right-click on the “plugins” folder and choose the “Rename” option.
- Rename the folder to something like “plugins-disabled” to deactivate all plugins at once.
- Once you’ve renamed the folder, try accessing your website again to see if the white screen error is resolved.
Remember, by renaming the plugins folder, all your plugins will be disabled. This step helps determine if any of the plugins were causing the white screen error.
If the issue is resolved, it confirms that the problem is caused by the plugins. Then, go back to the wp-content folder and rename the plugins-disabled folder back to its original name, which is “plugins.” Inside this folder, you will find subdirectories for each of your plugins.

Now, rename each of these folders one by one to disable them in WordPress. After disabling each folder, try accessing your site again. If the issue persists, go back to the folder and revert the changed name to its original, and proceed to the next folder.
Repeat this process until you identify the problematic plugin causing the error. Once you find it, delete the folder associated with that plugin to resolve the issue. If the problematic plugin is essential for your website, we recommend reaching out to the developer for assistance.
2. Disable the Active WordPress Theme
If the plugins are not the source of the issue, your active theme becomes the main suspect. Fortunately, disabling your theme is done in a similar way, but with a simpler process than the previous method. Open your FTP program again and navigate to the public_html > wp-content directory. Inside, locate the “themes” folder and follow the instructions below:
- Enter the “themes” folder.
- Find the folder corresponding to your currently active theme.
- Right-click on the theme folder and choose the “Rename” option.
- Rename the folder to something like “theme-disabled” to deactivate the current theme.
- Once you’ve renamed the folder, try accessing your website again to see if the white screen error is resolved.
By renaming the active theme folder, WordPress will automatically switch to the default theme. If the white screen error is resolved after disabling the theme, it indicates that the theme was causing the issue. In that case, you may need to contact the theme developer for assistance or consider using a different theme.
3. Adjusting the Memory Limit of Your WordPress Site
When you install plugins on your WordPress site, each plugin runs its own scripts. These files are filled with code to perform specific tasks. Each time they run, they consume some memory from your server. To prevent scripts from slowing down your site, WordPress limits the amount of memory these files can use. While this is generally a good thing in theory, some scripts may require more memory than what your installation needs. When this happens, you may encounter various WordPress errors, including the white screen error.
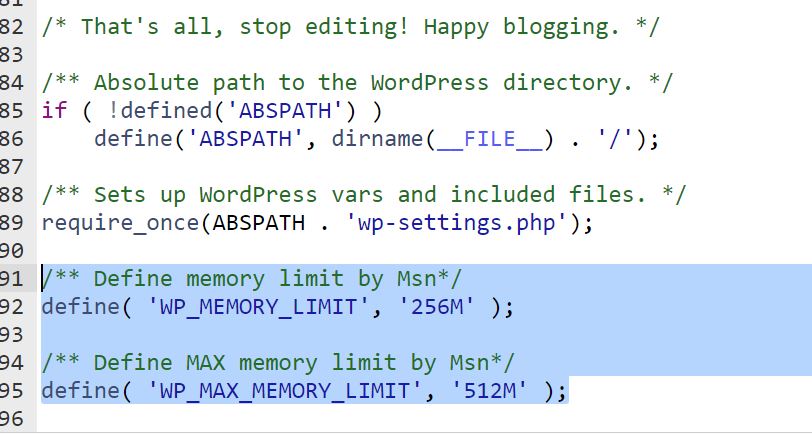
In such cases, the solution is simple – all you need to do is inform WordPress that your plugins or custom scripts may require a bit more memory. To do this, you’ll need to use FTP. Reconnect to your server using FTP and follow the instructions below:

- Locate the wp-config.php file in the root directory of your WordPress installation.
- Right-click on the file and choose the “View/Edit” or “Edit” option to open it in a text editor.
- Look for the line that says “/* That’s all, stop editing! Happy blogging. */”.
- Just above that line, add the following code:
- define(‘WP_MEMORY_LIMIT’, ‘256M’);
- This example sets the memory limit to 256 megabytes, but you can adjust it as needed.
- Save the changes to the wp-config.php file and close the text editor.
- Upload the modified wp-config.php file back to your server, replacing the existing one.
By increasing the memory limit, you allow WordPress and your plugins to utilize more memory if needed, potentially resolving issues such as the white screen error.
As always, try accessing your website to test if the white screen error has been resolved. If the issue persists, let’s move on to the next method.
4. Enabling WordPress Debug Feature
WordPress offers many features that can make your life easier. For example, there are certain features available to efficiently identify errors. However, these features are disabled by default as they are typically used by developers.
To enable them, you need to access your website via FTP. Then, follow the similar instructions below:
- Using an FTP client, connect to your website’s server.
- Navigate to the root directory of your WordPress installation (usually named public_html or www).
- Look for the wp-config.php file and download it to your local computer.
- Open the wp-config.php file using a text editor.
- Look for the line that says “/* That’s all, stop editing! Happy blogging. */”.
- Just above that line, add the following code:
- define(‘WP_DEBUG’, true);
- define(‘WP_DEBUG_LOG’, true);
- define(‘WP_DEBUG_DISPLAY’, false);
- Save the changes to the wp-config.php file and upload it back to the server, replacing the existing file.
- Now, WordPress debug mode is enabled. It will log any errors to a debug.log file located in the wp-content directory.
By enabling the debug feature, you can get more detailed error information that will assist you in troubleshooting the white screen issue.
5. Restoring Your Website Using a Backup
If all else fails, as a last resort, you can try restoring your website from a backup taken by your hosting company. Follow the steps below:
- Contact your hosting company’s support team and inquire about the available backups for your website.
- Provide them with the necessary details and request a backup restoration.
- Depending on your hosting company’s procedures, they will guide you through the process or perform the restoration on your behalf.
- Be aware that restoring a backup will revert your website to the state it was in when the backup was taken. Any changes or updates made after the backup was taken will be lost.
- After the restoration is complete, check your website to see if the white screen error has been resolved.
Restoring from a backup should only be done if you have exhausted all other troubleshooting options and have a recent backup available. It is always recommended to regularly backup your website to avoid data loss in situations like these.